
How To Install Pre-cast Concrete Sidewalk / Patio Slabs
These instructions only provide a suggested method of installing slabs - Freiling Innovation Inc. takes no responsibility for content accuracy or actual installation results by following these instructions.
IntroductionPrecast concrete slabs (a.k.a. "sidewalk blocks" , "patio blocks" , "slabs") are extremely popular material for a wide variety of uses, including sidewalks, patios, entry landings, foundation pads, walkways.
Slabs comes in an extremely wide range of designs, colours, shapes, weights, and sizes. Primarily, slabs are rectangular with sizes under 12"x12" to 24"x30" and weigh up to 120+ lbs. Slabs are popular because of their low cost per square foot of coverage versus other alternatives like poured concrete, asphalting, or patio block/stones. Also, the installation steps are less complex than the competing alternatives. Before beginning a slab installation project, it is important to understand the critical layers and material used in the installation of a precast concrete slab |

example of a sidewalk using precast sidealk slabs
|
|
|
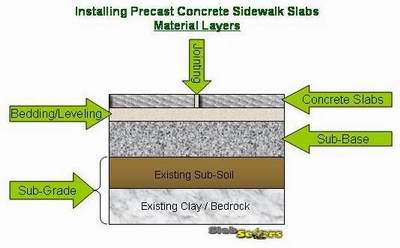
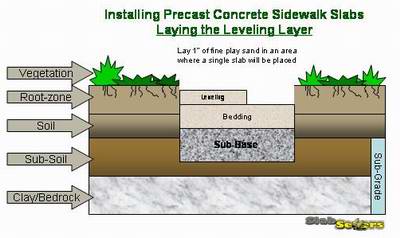
Bedding & Levelling: The layers that provide a critical smooth and level surface to place the slabs upon. The material used for these layers are either a single layer of medium-fine sand, or, two layers of a coarse construction sand and a fine play sand.
Precast Concrete Slab "slab": The top layer of pre-cast concrete slabs that are placed upon the leveling sand. The slabs are placed adjacent to each other in a desired pattern to provide the visible desired path. Narrow gaps (approx. 3/16") are placed between all the slabs to allow for the "jointing" material to fill these gaps and protect the slabs from future damage due to shifting.
Jointing: The fine material that fills the narrow gaps between the installed slabs. Jointing material provides four main purposes: 1) ensures the slabs do not move around, 2) protects slabs from rubbing against each other during shifting, 3) improves project appearance by filling in the gaps, 4) provides easier access point to extract slabs when future slab re-leveling is required. The preferred material is very fine sand.
INSTALLATION STEPS
Step 1 - Planning your Project
Prior to starting any work on the slab sidewalk, patio, or other slab project, it is important to properly plan out your project and ensure you have all the material and tools required to effectively complete the project and accomplish the goals you desire. Some points to consider when planning include:
- Read through all Installation Steps: To get a strong understanding of what is involved during the installation of sidewalk slab projects and to identify any potential limitations to your project site or materials needed, you should first read through ALL installation instructions.
- Purpose and demands placed upon the slabs: Is this a patio, sidewalk, garden path, parking pad, floor? What are the expected traffic patterns, traffic volumes, and loads on the slabs? What is the general ground conditions at the project location - soil types and layers, moisture/weather impact, etc.?
- Selection of Slabs: What is the desired look, pattern, and colour? What slabs will meet your project loads (i.e. thickness of slabs, dimensions of slabs, material used)? Talk to the slab dealer about all your project objectives, requirements, and site conditions to ensure the proper slab is used.
- Lay Out Project: Using a spray-paint can, chalk, or stakes, you should mark out your project at the location of your project. This ensures that any unforeseen location/site limitations will appear and changes can be made. Once you have finalized the site layout, write down the dimensions of the project site (i.e. lengths and widths).
- Purchase Materials: Using the project dimension, project requirements, and selected slab product, you should now be able to calculate and purchase all the material needed for your project. For example, if the slabs are 24"x24" and you plan on building a sidewalk about 20 feet long by 6 foot wide, you will need 30 slabs (you might want to buy a couple extra slabs for unforeseen events during installation, like a broken slab).
The amount and type of traffic will also determine the amount of Sub-base you would need. Typically for a sidewalk or patio, you can estimate a Sub-base depth of 4"-6" (use 6" for your calculations). You can also estimate 2" depth for your Bedding and 1" for your Leveling. Add a small amount to your leveling sand calculations for Jointing.
Based on the previous example of a 20'x6' sidewalk, you would estimate the following amounts of material:- Sub-Base: 6" depth of 3/4"-down Gravel or Limestone: (20x6x.5)/27= 2.3 Cubic Yards
- Bedding: 2" depth of Medium Sand: (20x6x.17)/27= .75 Cubic Yards
- Leveling & Jointing: 1" depth of Very Fine or Fine Sand: (20x6x(.08+.01))/27= .4 Cubic Yards
- Optionally - Geo-textile Membrane: covers the floor of the excavated ares where the sub-base would be pour on top
- Tools Required: A list of tools that will be needed to effectively install a small to medium slab project (for very large slab installation project, power equipment like back-hoes or excavators would likely be required):
|
A "MUST HAVE" Tool for this project! 
|
|
|
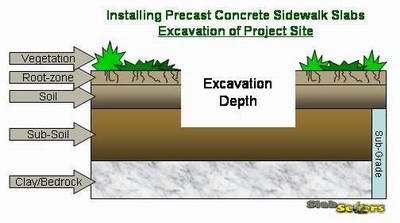
The sub-base material will collapse into these new voids and cause shifting/settling above it. If excavation must go deeper than 8"-10" in order to reach the sub-soil, your project will need more sub-base material later to recover the proper depth. DO NOT plan to use the excavated sub-soil material as part of your sub-base.
|
|
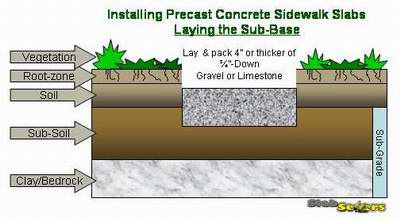
The thickness of the sub-base should be at least 4" but can be thicker in places throughout the project in order to provide both a level top surface of the sub-base and to attain a depth approximately equal to the combined thickness of the bedding, leveling, and slab material. This will ensure that the elevation of the installed slabs is approximately equal to the elevation of the ground.
Once the sub-base has been poured into the excavated site and spread to the required thickness, the sub-base material needs to be thoroughly compacted. Compacting this material is critical to remove all the "voids" or air pockets within the material. First, it is strongly recommended to use a power vibrating compactor (a.k.a. "Thumper" or "Tamper") to vibrate the material until it settles and you attain a smooth solid surface.
To further aid in the compacting process, use a garden hose to soak the sub-base material (this further encourages the finer material in the sub-base to fill any voids). Follow up this soaking with another session of using the vibrating compactor. If, after compacting, the sub-base top surface has significantly dropped in depth, apply another layer of sub-base material and compact again until you have reached the desired depth.
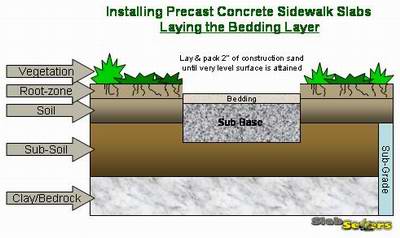
Step 4 - Installing the Bedding Layer
The next step is to overlay the sub-base with the "Bedding" layer. The bedding layer usually consists of a construction sand but there would be no issue in using the finer leveling sand for the bedding layer (except for increased cost in using more of the finer sand). The bedding layer is used to fill any remaining rough voids in the top surface of the sub-base and to form a much smoother site level of the surface prior to installing the actual concrete slabs.
|
The bedding layer is the last layer to be completely poured, leveled, and compacted in one complete step. When pouring the sand down onto the sub-base, a depth of approximately 2" should be maintained, but the first priority is to attain a very smooth surface. To assist in creating a smooth level surface, a level piece of timber could be pulled across the poured sand.
Follow up the pouring and leveling with a session of compacting (although it does not require extensive compacting as was the case in the sub-base). It is also very likely that after the first compacting, the bedding surface will have minor hills and valleys. Use the leveling board to scrape off the hills and fill in the valleys - then re-compact. Repeat this process until a very level and smooth bedding surface is been attained. |
|
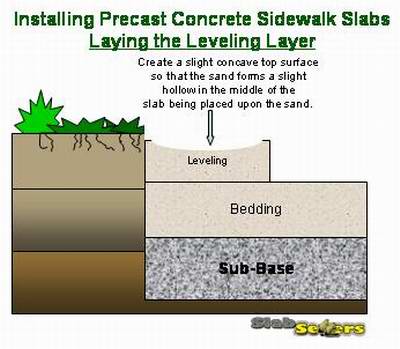
Step 5 - Install the Levelling Layer
The "Leveling" layer is the critical layer that the sidewalk slabs will actually rest upon. If installed correctly, the leveling sand will ensure that the slab is level to the site and all adjacent slabs and that the slab will not "wobble" when installed. Laying down an effective leveling sand to prevent a wobbling sidewalk slab is difficult BUT there is a valuable tip that this Step will provide. The most effective leveling sand is a very fine "play sand" although construction sand could be used as a lower cost alternative.
|
Unlike all previous layer, this layer is installed in lockstep to the actual placing of individual concrete slabs. In other words, the leveling sand should be poured and leveled in small sections - not much larger in size than the immediate slab being installed. This ensures that when the perfect level and surface has be created on the leveling sand, it is immediately covered so as to not disturb it from future project site activities.
When pouring the leveling sand, use just enough sand to provide a leveling surface (approximately 1" or less). Begin by creating a roughly smooth level surface with a board or trowel. Then, using your hand (and a work glove), create a top surface that is slightly concave in the center of the sand where the slab will be placed. By creating a concave in the center surface of the leveling sand, the bottom surface of the slab will be forced to rest on all its outer edges - THUS REDUCING SLAB WOBBLING. It is important to use your hand/glove to perform this critical leveling surface as your hand is the most effective tool to create the concave and provide the precise final sand placement adjustments. Once the desired level has been created for that slab being installed, it is critical that it not be disturbed in any way until the slab has been placed upon this surface. Also, DO NOT COMPACT THIS LAYER IN ANY WAY! This is very important to note as the leveling sand must be as loose and uncompacted as possible to allow for the weight and bottom surface of the slab to perform the final compaction. By letting the slab perform the compaction of this leveling sand, the sand will be allowed to fill any minor air-spaces or voids between the slab and the leveling sand - thus providing an even more sturdy slab installation (i.e. less wobbling of the slab). This process is repeated for each slab being installed. |
|
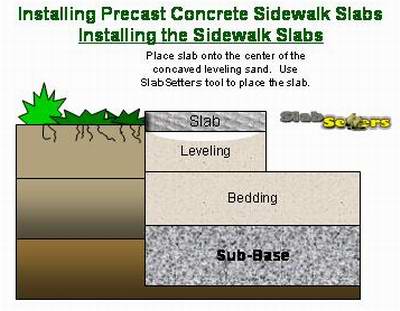
Step 6 - Installing the Sidewalk Slab
As was mentioned in Step 5, installing each sidewalk slab is performed in complete lockstep with installing the leveling sand. First the leveling sand for a single slab is set, then the slab is immediately placed on top of this leveled sand. If performed properly and with the right tools, these two steps will only have to be performed once per slab that is installed, but, do not be surprised if a slab does not end up at the exact desired elevation to the adjacent slabs or is slightly wobbling, and needs to be removed to repeat the process.
|
Installing the slab onto the precisely created leveling sand has always been the most difficult and frustrating step since, until recently, there has not been a tool on the market to specifically tackle this job. In order to not disturb the leveled sand, the slab has to be placed surgically and completely horizontally down onto the sand. If the slab was dropped into place or one edge placed onto the sand prior to the other edges, the sand would be disturbed thereby creating an unlevel and wobbly slab. The slab would have to be pried out of its resting place and the sand re-leveled again so that another attempt at placing the slab can occur. |

Click to enlarge
|

Click to enlarge
|
|
With the invention of the SlabSetters tool, the slab can be easily and precisely placed onto the leveling sand without disturbing the material. SlabSetters dramatically reduce the time, effort, and frustration of this step during installation, while at the same time provide you with a more sturdy and long-lasting install.
To install the slab, use the SlabSetters to lift the slab off the ground and position it over the leveling sand. Lower the slab onto the leveling sand and remove the SlabSetters tool. When installing sidewalk slabs adjacent to each other, make sure to leave a narrow gap between the slabs. By using the SlabSetters, a 3/16" gap is automatically created as the shaft of the SlabSetters tool has a diameter of 3/16". This gap will later be filled with "Jointing" material. Once the slab has been placed, stand on the slab and jump solidly on the surface several times. This will force the concave gap under the center of the slab to collapse and create a solid, sturdy, non-wobbling slab. If, after jumping on the slab several times the slab wobbles or the level to adjacent slabs is not correct, simply use the SlabSetters tool to remove the slab - repeat steps 4 & 5 again for this slab. |
|
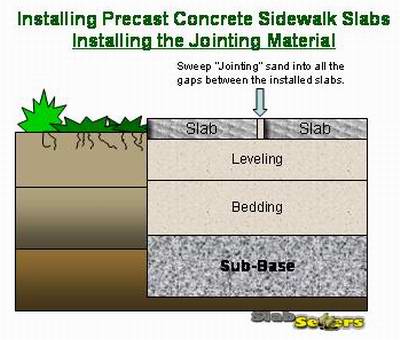
Step 7 - Installing the Jointing Material
Once all the slabs have been installed precisely to the project's desired results, the final step is to install the "Jointing" material between all the gaps that exist between all the installed slabs. The Jointing material ensures that the slabs lock together to prevent horizontal shifting. Also, the Jointing protects the slabs from rubbing against each other which could damage the slabs in the form of edge chipping or even cracking.
|
The most effective material is a fine sand. The leveling sand can be used although you might want to consider using some type of sifting process with the leveling sand to get an even finer material for use in Jointing. Installing the Jointing sand is very simple. Simply pour the fine sand evenly all over the installed slabs. Then, using a broom (an industrial floor broom is very effective), sweep the sand back and forth into all the gaps between the slabs until all the gaps have been filled. Over time the Jointing sand will settle which will make the gaps become pronounced again. Simply apply more Jointing sand with the broom until the gaps are filled again. To speed up the settlement process you can spray water lightly over your slabs after the first round of Jointing has completed. If you decide to apply water in this manner, DO NOT aggressively spray water directly at the gaps that have just been filled. This will force the fresh and lose Jointing material to be excavated out of the gaps - thus forcing you to refill the gaps with more Jointing sand. |
|
|

|
These instructions only provide a suggested method of installing slabs - Freiling Innovation Inc. takes no responsibility for content accuracy or actual installation results by following these instructions.